noun
The dimensions of the A series paper sizes, as defined by the ISO 216 standard, are given in the table below in both millimetres and inches (cm measurements can be obtained by dividing mm value by 10). The A Series paper size chart to the right gives a visual explanation of how the sizes relate to each other - for example A5 is half of A4 size paper and A2 is half of A1 size paper.
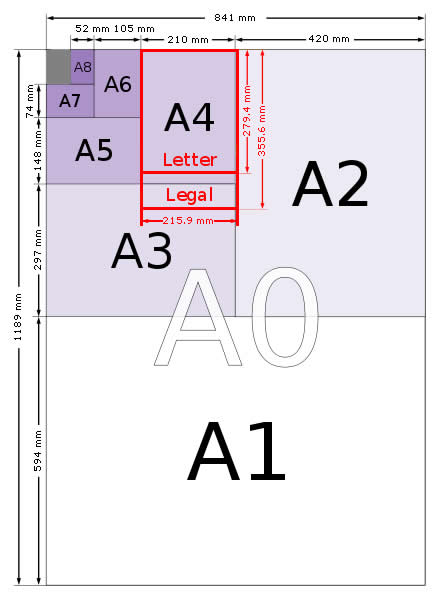
Table of Paper Sizes From 4A0 to A10
| Size | Height x Width (mm) | Height x Width (in) |
| 4A0 | 2378 x 1682 mm | 93.6 x 66.2 in |
| 2A0 | 1682 x 1189 mm | 66.2 x 46.8 in |
| A0 | 1189 x 841 mm | 46.8 x 33.1 in |
| A1 | 841 x 594 mm | 33.1 x 23.4 in |
| A2 | 594 x 420 mm | 23.4 x 16.5 in |
| A3 | 420 x 297 mm | 16.5 x 11.7 in |
| A4 | 297 x 210 mm | 11.7 x 8.3 in |
| A5 | 210 x 148 mm | 8.3 x 5.8 in |
| A6 | 148 x 105 mm | 5.8 x 4.1 in |
| A7 | 105 x 74 mm | 4.1 x. 2.9 in |
| A8 | 74 x 52 mm | 2.9 x 2.0 in |
| A9 | 52 x 37 mm | 2.0 x 1.5 in |
| A10 | 37 x 26 mm | 1.5 x 1.0 in |
To obtain paper sizes in centimetres, convert mm values to cm by dividing by 10 and in feet by dividing inch values by 12
.
Letter or US Letter is the most common paper size for office use in North America, Bolivia, Colombia, Venezuela, the Philippinesand Chile.[1] It measures 8.5 by 11 inches (215.9 mm x 279.4 mm). US Letter size is a recognized standard adopted by the American National Standards Institute (ANSI) whereas the A4 is the International Standard (ISO) used in most countries.
Ronald Reagan made this the paper size for U.S. federal forms in the early 1980s; previously, the smaller "official" Government letter size, 8 in × 10.5 in (203.2 mm × 266.7 mm), was used.[2]
In the U.S., paper density is usually measured in "pounds per ream" (of 500 sheets). Typical letter paper has a basis weight of 20 or 24 pounds (9 or 11 kg) – the weight of 500 sheets (a ream) of 17-by-22-inch (431.8 by 558.8 mm) paper at 70° F (21.11°C) and at 50% humidity.[3] One ream of 20-pound letter-sized paper weighs 5 pounds, and a single letter-sized sheet of 20-pound paper weighs 0.16 ounces (4.54 g), which is equivalent to 72 g/m2 (72gsm).[4]
Unlike the A4 (210 × 297 mm) international standard (ISO) paper sizes which are used in most countries in the world today, the origin of the dimensions of letter size paper are lost in tradition. The American Forest and Paper Association argues that the dimension originates from the days of manual paper making, and that the 11-inch length of the page is about a quarter of "the average maximum stretch of an experienced vatman's arms".[2] However, this does not explain the width or aspect ratio.
http://en.wikipedia.org/wiki/Letter_(paper_size)..............................................................................................................................................
COLOUR.
noun
colour could refer to the hue, saturation, tone, opacity (and more) of the appearance of a design.
Color or colour (see spelling differences) is the visual perceptual property corresponding in humans to the categories calledred, blue, yellow, green and others. Color derives from the spectrum of light (distribution of light power versus wavelength) interacting in the eye with the spectral sensitivities of the light receptors. Color categories and physical specifications of color are also associated with objects or materials based on their physical properties such as light absorption, reflection, or emission spectra. By defining a color space, colors can be identified numerically by their coordinates.
Because perception of color stems from the varying spectral sensitivity of different types of cone cells in the retina to different parts of the spectrum, colors may be defined and quantified by the degree to which they stimulate these cells. These physical or physiological quantifications of color, however, do not fully explain the psychophysical perception of color appearance.
The science of color is sometimes called chromatics, chromatography, colorimetry, or simply color science. It includes the perception of color by the human eye and brain, the origin of color in materials, color theory in art, and the physics ofelectromagnetic radiation in the visible range (that is, what we commonly refer to simply as light).

a gamut is a way of showing the colour possibilities of a colour mode like cmyk

international colour standardisation is in effect through pantone colour matching system

PRODUCTION.
noun
production could refer to the preparatory work involved in creating a printed design.
resolution looks at the image quality and information needed to make up the image whether on screen or for print.
pixel depth measures resolution and is the number of bits available to make up the colour for each pixel.
1 bit is either black or white pixels. 8 bit greyscale is 256 shades of grey or 256 different colours.
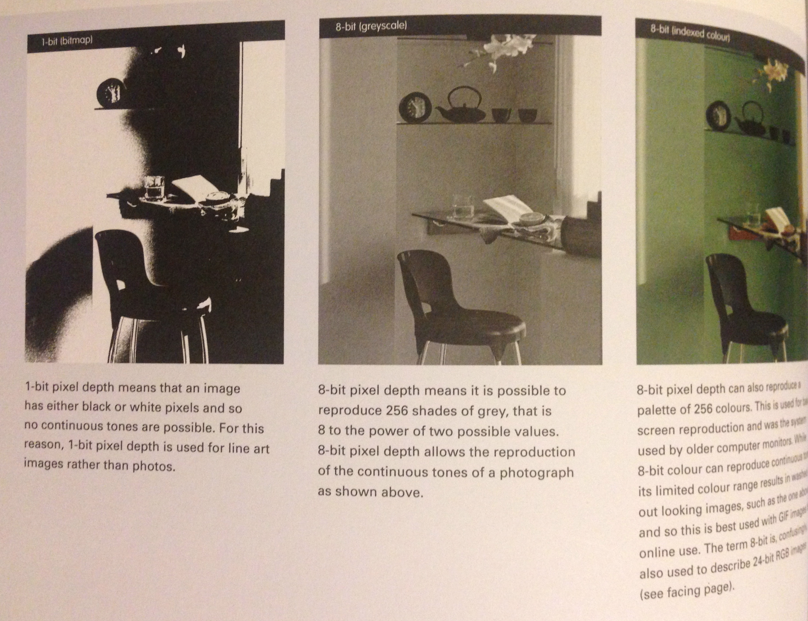
24 bit rgb can produce around 16million colours. 16 bit means each of the rgb colour chanels has 16 bits making it up.

spi is about scanner sampling and how much info a scanner can record. ppi is pixels per inch horisontally and vertically.

dpi is dots per ich and refers to how many ink dots the printer can do. lpi lines per inch refers to the number of cells in a half tone grid.

overprinting is a method used to mix or separate colours for print and can save money because you can make new colours from printing over other colours with a new one.

gradients are when there is a fade from one colour to another seamlessly.

bleed registration and trim are imporant factors in print set up. when cmyk is split the overlay has to be exact so that the colour mix looks correct. otherwise you casn get ghosting where the image looks blurred. registration marks help align the different colours.


knowckout priniting is wherecolours are separate to each other even if coloured objects appear to overlap. overprint is where colours are printed ontop and a different hue occurs.

imposition is very important in organisation because for printed booklets it means the printer can print the right pages on each side so that when put together the publication reads coherently.

..............................................................................................................................................
PROCESS.
noun
process could refer to the methods of printing used to achieve the final product.
i began by researching the digital processes i didnt know about.
- offset printing
Offset printing or web offset printing is a commonly used printing technique in which the inked image is transferred (or "offset") from a plate to a rubber blanket, then to the printing surface. When used in combination with the lithographic process, which is based on the repulsion of oil and water, the offset technique employs a flat (planographic) image carrier on which the image to be printed obtains ink from ink rollers, while the non-printing area attracts a water-based film (called "fountain solution"), keeping the non-printing areas ink-free. The modern "web" process feeds a large reel of paper through a large press machine in several parts, typically for several metres, which then prints continuously as the paper is fed through.
The ink duct roller delivers ink from the ink duct to the ink pyramid, also called the Ink Train.

Offset lithography is a process used for printing on a flat surface, using printing plates. An image is transferred to a printing plate, which can be made of a variety of materials such as metal or paper.
Some of its common applications include newspapers, magazines, brochures, stationery and books. The main advantage of offset lithography is its high and consistent image quality

- digital printing
Digital printing refers to methods of printing from a digital-based image directly to a variety of media.[1] It usually refers to professional printing where small-run jobs from desktop publishing and other digital sources are printed using large-format and/or high-volume laser or inkjet printers. Digital printing has a higher cost per page than more traditional offset printing methods, but this price is usually offset by avoiding the cost of all the technical steps required to make printing plates. It also allows for on-demand printing, short turnaround time, and even a modification of the image (variable data) used for each impression.[2] The savings in labor and the ever-increasing capability of digital presses means that digital printing is reaching the point where it can match or supersede offset printing technology's ability to produce larger print runs of several thousand sheets at a low price.[3]
- laser printing
Laser printing is an electrostatic digital printing process that rapidly produces high quality text and graphics by passing a laser beamover a charged drum to define a differentially charged image. The drum then selectively collects charged toner and transfers the image to paper, which is then heated to permanently fix the image.
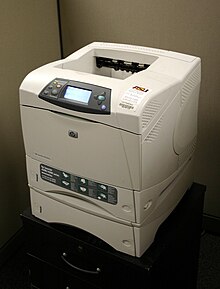
In older printers, a corona wire positioned parallel to the drum, or in more recent printers, a primary charge roller, projects an electrostaticcharge onto the photoreceptor (otherwise named the photo conductor unit), a revolving photosensitive drum or belt, which is capable of holding an electrostatic charge on its surface while it is in the dark.
An AC bias is applied to the primary charge roller to remove any residual charges left by previous images. The roller will also apply a DCbias on the drum surface to ensure a uniform negative potential.
Numerous patents[specify] describe the photosensitive drum coating as a silicon sandwich with a photocharging layer, a charge leakage barrier layer, as well as a surface layer. One version[specify] uses amorphous silicon containing hydrogen as the light receiving layer,Boron nitride as a charge leakage barrier layer, as well as a surface layer of doped silicon, notably silicon with oxygen or nitrogen which at sufficient concentration resembles machining silicon nitride.


The paper passes through rollers in the fuser assembly where heat of up to 200 °C (392 °F) and pressure bond the plastic powder to the paper.
One roller is usually a hollow tube (heat roller) and the other is a rubber backing roller (pressure roller). A radiant heat lamp is suspended in the center of the hollow tube, and its infrared energy uniformly heats the roller from the inside. For proper bonding of the toner, the fuser roller must be uniformly hot.


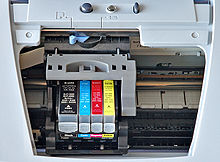
- inkjet printing
Inkjet printing is a type of computer printing that creates a digital image by propelling droplets of ink onto paper, plastic, or other substrates. Inkjet printers are the most commonly used type of printer,[1] and range from small inexpensive consumer models to very large professional machines that can cost tens of thousands of dollars, or more.[2]
In CIJ technology, a high-pressure pump directs liquid ink from a reservoir through a gunbody and a microscopic nozzle, creating a continuous stream of ink droplets via thePlateau-Rayleigh instability. A piezoelectric crystal creates an acoustic wave as it vibrates within the gunbody and causes the stream of liquid to break into droplets at regular intervals: 64,000 to 165,000 droplets per second may be achieved. The ink droplets are subjected to an electrostatic field created by a charging electrode as they form; the field varies according to the degree of drop deflection desired. This results in a controlled, variable electrostatic charge on each droplet. Charged droplets are separated by one or more uncharged "guard droplets" to minimize electrostatic repulsion between neighbouring droplets.

Most consumer inkjet printers, including those from Canon, Hewlett-Packard, and Lexmark, use the thermal inkjet process. The thermal inkjet principle was discovered by Canon engineer Ichiro Endo in August 1957. In the thermal inkjet process, the print cartridges contain a series of tiny chambers, each containing a heater, all of which are constructed by photolithography. To eject a droplet from each chamber, a pulse of current is passed through the heating element causing a rapid vaporization of the ink in the chamber to form a bubble, which causes a large pressure increase, propelling a droplet of ink onto the paper
- flexography
Flexography (often abbreviated to flexo) is a form of printing process which utilizes a flexible relief plate. It is essentially a modern version of letterpress which can be used for printing on almost any type of substrate, including plastic, metallic films, cellophane, and paper. It is widely used for printing on the non-porous substrates required for various types of food packaging (it is also well suited for printing large areas of solid color).It is printing on plastic.


Flexography has been widely used as a quick and economical way of applying simple designs and areas of colour to a wide variety of packaging materials, such as paper and plastic containers (including waxed-paper ones), corrugated-cardboard boxes, tape, envelopes, and metal foil. The inks used can be overlaid to achieve brilliant colours and special effects. Among the fluid inks used in flexography areaniline inks (aniline dyes dissolved in alcohol or some other volatile solvent), polyamide inks, acrylic inks, and water-based inks. These are superior to oil-based printing inks because they adhere to the surface of the material, while oil-based inks must be absorbed into the material.
- letterpress printing
Letterpress printing is a technique of relief printing using a printing press. A worker composes and locksmovable type into the bed of a press, inks it, and presses paper against it to transfer the ink from the type which creates an impression on the paper.
In practice, letterpress also includes other forms of relief printing with printing presses, such as wood engravings, photo-etched zinc "cuts" (plates), and linoleum blocks, which can be used alongside metal type in a single operation, as well as stereotypes and electrotypes of type and blocks.[1] With certain letterpress units it is also possible to join movable type with slugs cast using hot metal typesetting.
Letterpress printing was the normal form of printing text from its invention by Johannes Gutenberg in the mid-15th century until the 19th century and remained in wide use for books and other uses until the second half of the 20th century. Letterpress printing remained the primary way to print and distribute information until the twentieth century, when offset printing was developed, which largely supplanted its role in printing books and newspapers. More recently, letterpress printing has seen a revival in an artisanal form.


RISOGRAPH PRINTING
having visited a risograph printers in leeds i was relatively clued up on the process but felt some more research would better inform my understanding.
Risograph is a high-speed digital printing system manufactured by the Riso Kagaku Corporation[when?] and designed mainly for high-volume photocopying and printing. Increasingly, Risograph machines have been commonly referred to as a RISO Printer-Duplicator, due to their common usage as a network printer as well as a stand-alone duplicator. When printing or copying multiple quantities (generally more than 20) of the same origin, it is typically far less expensive per page than a conventional photocopier, laser printer, or inkjet printer. Printing historian Rick O'Connor has debated that the original, and thus correct, name for the device is RISSO and not RISO. This debate spawns from the notion that an extra 'S' is added because the inventor's wife found it more pleasing to the ears.

thanks to jordan getting in touch and organising the trip, some of us were able to go to Footprinters risograph and digital printers co-op in chapeltown leeds.


they are a small co-operavtive print studio who work mainly with risographic printing but also offer digital printing jobs and binding using a collator. we got there and were given a tour of their studio and a walkthrough of the different processes and production offered and how to organise jobs with them. they offer five colour printing: black, blue, green, red and fluorescent pink ink.

some examples of jobs done at footprinters:


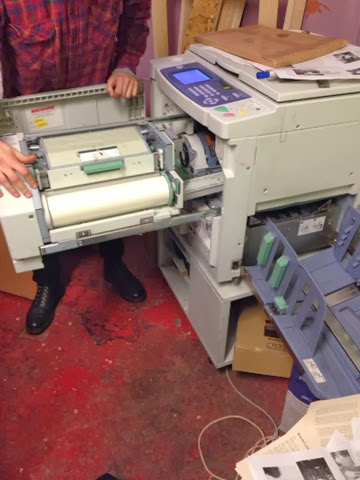
Rz machine
the RISO RZ 570 risographic printing machine was the model they had and basically operates in a similar way to the screen printing process in that it uses an acetate like screen with the design on it and the machine pushes ink through it while attached to a roller that is rolled over the stock to make the print.

this photo depicts how the plastic sheet (the black one round the outside of the pullout) with the design on it is attached to the ink tub (the middle component with a black ring on the end) round a roller that picks up ink from the tub and pushes it through the stencil onto the stock that is run through the machine on an opposing roller.

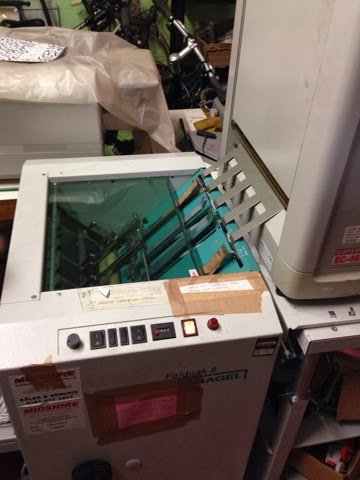
this is the master roll tray which hold the material with which the master sheet is made and used to print the design onto the stock. the original design is either scanned in using the machines scanner or supplied to the machine digitally. it then reads the image and proceeds to burn tiny holes into the master sheet in correspondence to the original design like halftone. the ink can then be pushed through the master.
prints are then shot out the machine into a collection tray and left to dry with the inclusion of quality control testing.

ink tubs can be removed from the centre to be refilled or changed.

they also had a collator machine which organises and binding printed booklets from the print.
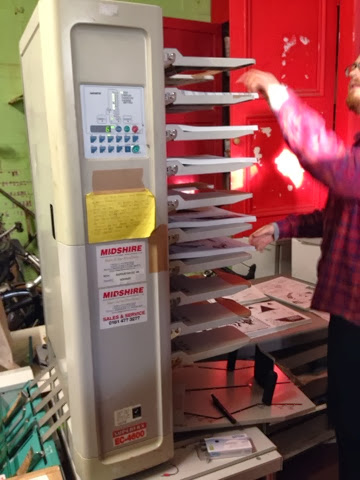
it organises the sheets into an ordered booklet and then collects them and folds them.

the machine then staple binds the sheets together to make the finished product.

i was really glad to have had this first hand insight into how risograph printing becuase i think its a useful and interesting process with quite a particular aesthetic quality that, when used with the right style and form of design, can really lend itself to the printed impact. at footprinters they only use environmentally minded stocks and inks and all waste is recycled to minimise the carbon footprint they output. i think this is a really good outlook to have as a print studio because sustainability is an important consideration in print. the risograph printing process is really appropriate for larger promotional jobs like flyers or zines because it is cost effective and fast. they do however offer a limited colour pallette but by overlapping and setting opacities you can often get around this setback. for really fine quality and detailed prints and one offs the risograph printer isnt really cost of finish effective.
SCREEN PRINTING
as part of my primary research into different print processes i decided to undergo some screen printing to test, re familiarise myself with, and better understand the process. in terms of designs to print i used a recent cartoon design ive been working on as part of a colleagues recently established clothing company based in london. the design, originally intended for t-shirt, is easily transferreable and appropriate for a poster and is also a good way for me to test its aesthetic while also researching the screen printing process.
because jordan and dan had also decided to do some screen printing we did it together. we bought exposure times and paper binder from the shop then chose our screens.

having selected our screen it was then a case of getting rid of the present exposure. i had to sponge the screen with water and b-strip to loosen the uv paint then scrub it off with the pressure hose and the wash with b-solve. because these products are toxic we i had to wear protective clothing as depicted below.


we each had to label our screen to avoid mix up or use by another student prior to the expiry of our temporary ownership.

after the screen dried it was a case of applying a layer of uv light sensetive paint which would create the stencil of our exposure.

you fill the trough with uv paint then bring it up the screen much like the printing process itself.


once its applied you put it in the uv paint dryer for 20 minutes to harden the paint to the screen
while it was drying i went and printed my negatives to expose on the screens.


when the paint dries its ready to be exposed to the negative of whatever design you choose to print. depending on the type of screen, type of design, format of deisgn, type of paper or other material used to supply the negative the exposure time to uv light will differ. the technician did the exposing for us though. when the design has been exposed you can wash the excess paint off the screen leaving the stencil form of your design taken out of the remaining paint.


as part of my test i left some of the uv paint on the screen to give that brick look when printed.

once this is done i just had to wait for the screen to dry and then i could start printing.
the process itself was based around lining up the two negatives so the designs would correlate as planned when printed on top of each other.


i fixed the screen to the frame and then did a test print on the Truegrain test paper so i could line up the two designs correctly.


after that is was just a case of applying the paint to the screen and scraping the squeegee across the screen.
i left the prints on the rack to dry and then collected them at the end of the day.
as another part of the screen printing process i decided to test some different colours and different inks. one of the inks i tried was heat sensetive and dissapeared when exposed to heat. i bought the ink from rossington street and mixed it at blenheim.


the prints prduced some really interesting effects and i think added a lot to the aesthetic of the design.

i really enjoyed doing the screen printing test because its a process that i enjoy anyway and want to become better at but, also because it was a way for me to consider a printing process in a real time context. by doing it i have become more understanding of the practicalitites and problems involved in screen printing. for aesthetic value, detail, hand rendered look it is a really appropriate process. however, time wise and in terms of costs and labour for mass production it isnt very suitable.
..............................................................................................................................................
MONO-PRINTING.
another print process i decided to test out was mono-printing. this process involves creating a relief from a piece of stock ontop of a flat layer of ink. whn pressure is applied from a point, eg a pencil, it pushes the stock into the ink and prints onto it. for this i decided to try a mix of image traces and free hand designs to practice the process and explore the different techniques and effects.
the equipment needed for mono printing is a roller, spatula, and ink, along with stock.


i started by applying ink to the table with the spatula at a slightly larger size that the a4 stock.

i then had to use the roler to spread the ink across the glass, evening it out.


after a lot of rling the ink was rolled outinto an even square ready to print.

i put down a few test sheets to blot the surface so the ink transfer wasnt too thick


after the ink was even i coud then lay the stock on top and begin drawing

i tried not to put any pressure on the page apart from the pencil but sometimes my hands rested on the paper and so connected with the ink leaving a mark on the print.

another aspect to consider was that because it is a transfer process anything done on the back on the stock will appear backwards on the front side. taking this into account i did my lettering backwards.


i dont think the first test came out too well because i aplied too much pressure and touched with my hands too.

i started to get the hang after a few goes and then was able to make my lines clearer and more equally weighted.

i decided to try tracing over an image from a print and see how that came out.

becuase i wanted to add my own style to the image i used the photo as a basis and altered it with the pencil.


i thought this process was really enjoyable and simple once i got the hang of the best pressures. i think it can produce an interesting 'rustic', hand rendered aesthetic which i like. it would be appropriate for more personal or child associated designs because of its softer look. i think it would also work for one offs or small projects. because you have to each print separately it is very time consuming and takes a lot of effort and patience but i think its work it. however, for that reason it wouldnt really be suitable for large or 'clean' jobs.
another process i wanted to try was lino printing. this process invloved the removal of parts of a lino sheet to create an image on it that is then coverd in ink and pressed to stock leaving the negative of the image printed on the stock. once cut the lino print can be reused as many times as you want making it a useful process for multiple outcomes.
Linocut is a printmaking technique, a variant of woodcut in which a sheet of linoleum (sometimes mounted on a wooden block) is used for the relief surface. A design is cut into the linoleum surface with a sharp knife, V-shaped chisel or gouge, with the raised (uncarved) areas representing a reversal (mirror image) of the parts to show printed. The linoleum sheet is inked with a roller (called a brayer), and then impressed onto paper or fabric. The actual printing can be done by hand or with a press.
Since the material being carved has no directional grain and does not tend to split, it is easier to obtain certain artistic effects with lino than with most woods, although the resultant prints can lack the often angular grainy character of woodcuts and engravings. Lino is generally much easier to cut than wood, especially when heated, but the pressure of the printing process degrades the plate faster and it is difficult to create larger works due to the material's fragility.

using oil based inks rolled on the table to spread the ink.

i applied the ink to the lino cut

i then put the lino cut into protective sheets and put the print stock on top

using the mechanical press i allplied pressure which transfereed the ink to the stock. i tested varuous stock to see the aesthetic differences.

..............................................................................................................................................
FINISHING.
verb
FOILING
foiling is a process by which a screen printed design (printed using special glue) is then overlayed with heat sensitive foil. the print is then put through a heat press for 12 seconds at 160 degrees. this binds the foil to the glue and then the excess can simply be removed leaving the printed design with a foiled finish. foil varnish gives a fantastic aesthetic and is great for cover design and important, high brow jobs but it is quite expensive and wouldnt really suit a full publication or some such design.
i began by exposing a fabric screen because the threadcount of a paper screen is too fine for the texiflock adhesive. having done this it was just a case of setting up the screen on a bed and begining to print in the same way as normal screen printing.


because the texiflock is thick and a fast drying substance i had to open the windows to lessen drying time on the screen. even still the glue began hardening after about 4 pulls which was suprising but informaive to the process because its one you have to work really fast with.


having pulled the prints i washed the screen and saved the excess texiflock. i left the prints to dry on the rack and came back the next day to do the foiling.

because the process relys on heating the glue to the foil it didnt matter if it dried on the stock because the heat press would re melt it.

having printed it was then a case of sealing the fiol to the stock and glue using the heat press. its important to protect the foil and stock so you have to sandwich inbetween newsprint and then put it in the press.

it takes 10 seconds at 160 degrees to seal the ink and foil but 8 - 12 seconds is still acceptable.

once the time is up take the stock and foil out and leave it to dry for 10 minutes to the foil is secured to the stock completely.

from this it was just a case of pealing the foil from the stock. i had seen people doing it before and on one occasion someone pulled it too fast and not all the foil stayed fastened to the stock and so parts of the print appeared missing. because i knew this i was extra slow and careful when peeling the foil away.

this resulted in fantastically clean and neat prints because no eccess foil was left and nothing was taken from the print.


i think foiling is a really easy and enjoyable process if you are prepared and organised. because texiflock is fast drying it is importnat to set everything up prior to putting it on the screen. i fixed my screen to the frame, set up my stock next to the bed, llined the frame with the stock to ensure evenly placed prints and put masking tape markers on the bed. having checked over everything i could then print. because i was organised everything wenty smoothly but i can see how easily something could go wrong with this process. i think the aesthetic is brilliant for foiling - professional and smart but lively eye catching. i think a lot of different tones can be acheieved with foiling depending on how you use it and the colours etc. the process is quite expensive and time consuming so its not really viable for larger jobs and doesnt really work with body copy because large passages are affected in legibility by the sheen of the foil. as a finishing and decorative process, however, foiling has its advantages and uses. as a highlight to something important, as decorative design, for headings or titles, involved with binding.
SPOT VARNISHING
spot varnishing is a form of screen printing that follows the same basic method but uses spot varnish as the paint. the screen is printed in the same way and when the varnish dries it becomes reflective and posesses a sheen which is especially effective on black stock. there is also uv senstive spot varnish which harden when exposed to uv light leaving a more noticeable shine and a raised finish.
because i had already exposed some paper screens i decided to use the same ones because it saved time and cost. the process is however the same as normal screen printing and paper screens can still be used becuase its still printing on paper stocks.
using the smaller screen i printed the white design on the stock first. i decided to use white on black card stock because i think it shows up really clearly. the matte black also creates a nice contrast with the sheen and gloss finish of the varnish and so showed up well when printed.
unfortunately, when printing the white i had some trouble with the bleed of the paint through the screen which left a ghost print around the main design on the stock. tis only occurred once or twice and so i began wiping the underside of the screen after each print so the bottom was clear when pressed to the stock. this sorted it out and it didnt happen again. i wasnt quite sure why it happened in the first place but it could have been due to the consistency of the paint on the screen being slightly thin.

ETCHING.
Etching is the process of using strong acid or mordant to cut into the unprotected parts of a metal surface to create a design in intaglio in the metal (the original process—in modern manufacturing other chemicals may be used on other types of material). As an intaglio method of printmaking, it is, along with engraving, the most important technique for old master prints, and remains in wide use today.

plastic etching is a simple form of the more intricate metal and copper etching processes. it involves the scraping of different etching tools on a plastic sheet to create patterns, type or any other designs. once again, because its a relief print processs the designs on the plate must be backwards to come out forwards. once the design is finished cover the plate with ink and wet the stock then blot it. put the stock over the plate with surrounding newspaper and place in the press then press the press down to print. once the stock has dried the print can be used. plastic etching is aother reusable print process but its manual nature means a long time consideration.

LASER CUTTING
EMBOSSING/DEBOSSING
emobossing is where the design is raised from the stock and debossing is where the design is sunk into the stock. both processes ivolve the design and production of a negative raised stencil usually done on wood but can also be achieved with vinyl or lino. the negative will either hold the design as raised or sunk in to the block. the bloc should cover the entire surface area of the stock. then the stock is placed under the block and pressure is applied by a press for a certain time and the result is imprinted into the stock.
spot varnishing is a form of screen printing that follows the same basic method but uses spot varnish as the paint. the screen is printed in the same way and when the varnish dries it becomes reflective and posesses a sheen which is especially effective on black stock. there is also uv senstive spot varnish which harden when exposed to uv light leaving a more noticeable shine and a raised finish.
because i had already exposed some paper screens i decided to use the same ones because it saved time and cost. the process is however the same as normal screen printing and paper screens can still be used becuase its still printing on paper stocks.
using the smaller screen i printed the white design on the stock first. i decided to use white on black card stock because i think it shows up really clearly. the matte black also creates a nice contrast with the sheen and gloss finish of the varnish and so showed up well when printed.
unfortunately, when printing the white i had some trouble with the bleed of the paint through the screen which left a ghost print around the main design on the stock. tis only occurred once or twice and so i began wiping the underside of the screen after each print so the bottom was clear when pressed to the stock. this sorted it out and it didnt happen again. i wasnt quite sure why it happened in the first place but it could have been due to the consistency of the paint on the screen being slightly thin.
i set up the screen on the bed and prepared all my stock and squeegee and other equipment needed then got the varnish ready. similarly to texiflock the varnish is quite fast drying and can dry on the screen quickly which hinders the quality of print. the varnish is, however, very runny and is really easy to work with when printing.
because its a thin consistency its really easy to pull across the screen and also to flood. this made it really fast to work with which is good because it dried quickly too. each pull cane through really well and having tested a few prints i started applying two pulls to each print to give a thicker more even varnish.
because its so runny and easy to manouvere round the screen i had printed all my designs in no time and was able to put the excess varnish back in the pot to save which was useful. i then put my prints on the drying rack and left them to dry.

spot varnish printing has been one of my favourite processes so far as the varnish was so easy to work with that everything was done really quickly and i had varnish left to use otherwise. cost wise it was really effective and could be used on larger jobs but i dont think mass produced jobs when done by hand because it would take longer then and the varnish would be more likely to dry which would mean even longer time scale. its range of use is quite limited though because it will only show up clearly on certain colours and types of stock. furthermore, its practicality is limited mainly to aesthetic aspects of a design becuase it would be quite hard to read text below about 35 pt and the font would have to be quite think and blocky. as a finishing process it has a really wide range of uses with a lot of creative potential.
Etching is the process of using strong acid or mordant to cut into the unprotected parts of a metal surface to create a design in intaglio in the metal (the original process—in modern manufacturing other chemicals may be used on other types of material). As an intaglio method of printmaking, it is, along with engraving, the most important technique for old master prints, and remains in wide use today.
The design is then drawn (in reverse) with an etching-needle or échoppe. An "echoppe" point can be made from an ordinary tempered steel etching needle, by grinding the point back on a carborundum stone, at a 45–60 degree angle. The "echoppe" works on the same principle that makes a fountain pen's line more attractive than a ballpoint's: The slight swelling variation caused by the natural movement of the hand "warms up" the line, and although hardly noticeable in any individual line, has a very attractive overall effect on the finished plate. It can be drawn with in the same way as an ordinary needle.
The plate is then completely submerged in an acid that eats away at the exposed metal. Ferric chloride may be used for etching copper or zinc plates, whereas nitric acid may be used for etching zinc or steel plates. Typical solutions are 2 parts FeCl3 to 2 parts water and 1 part nitric to 3 parts water. The strength of the acid determines the speed of the etching process.
- The etching process is known as biting (see also spit-biting below).
- The waxy resist prevents the acid from biting the parts of the plate which have been covered.
- The longer the plate remains in the acid the deeper the "bites" become.

plastic etching is a simple form of the more intricate metal and copper etching processes. it involves the scraping of different etching tools on a plastic sheet to create patterns, type or any other designs. once again, because its a relief print processs the designs on the plate must be backwards to come out forwards. once the design is finished cover the plate with ink and wet the stock then blot it. put the stock over the plate with surrounding newspaper and place in the press then press the press down to print. once the stock has dried the print can be used. plastic etching is aother reusable print process but its manual nature means a long time consideration.

LASER CUTTING
laser cutting, while not a traditional printing metod, is still essentially one. while being useful in making stencils and cutting laser cutting can also be set to just sear a surface leaving an imprinted design. you can print halftone and still achieve detail or intricacy.

Laser cutting is a technology that uses a laser to cut materials, and is typically used for industrial manufacturing applications, but is also starting to be used by schools, small businesses, and hobbyists. Laser cutting works by directing the output of a high-power laser, by computer, at the material to be cut. The material then either melts, burns, vaporizes away, or is blown away by a jet of gas,[1] leaving an edge with a high-quality surface finish. Industrial laser cutters are used to cut flat-sheet material as well as structural and piping materials.
http://en.wikipedia.org/wiki/Laser_cutting
http://en.wikipedia.org/wiki/Laser_cutting
EMBOSSING/DEBOSSING
emobossing is where the design is raised from the stock and debossing is where the design is sunk into the stock. both processes ivolve the design and production of a negative raised stencil usually done on wood but can also be achieved with vinyl or lino. the negative will either hold the design as raised or sunk in to the block. the bloc should cover the entire surface area of the stock. then the stock is placed under the block and pressure is applied by a press for a certain time and the result is imprinted into the stock.
Embossing and debossing are the processes of creating either raised or recessed relief images and designs in paper and other materials. An embossed pattern is raised against the background, while a debossed pattern is sunken into the surface of the material (but might protrude somewhat on the reverse, back side).


Die cutting is the process of using a die to shear webs of low-strength materials, such as rubber, fiber, foil, cloth, paper,corrugated fiberboard, paperboard, plastics, pressure-sensitive adhesive tapes, foam and sheet metal. In the metalworkingand leather industries, the process is known as clicking and the machine may be referred to as a clicking machine.[1][2]When a dinking die or dinking machine is used, the process is known as dinking.[1][3] Commonly produced items using this process include gaskets,[4] labels, corrugated boxes, and envelopes.

- hot stamping
Hot stamping allows for the forming of complex part geometries, traditionally achieved only through the cold forming of mild steels, with the final part achieving ultra high strength material properties. Applications of this process include body pillars, rockers, roof rails, bumpers and door intrusion beams.
http://www.magna.com/capabilities/body-chassis-systems/innovation-technology/hot-stamping
..............................................................................................................................................
STOCK.
| A term for unprinted paper. |
1 : any of various plants (as pines, poplar, or grass) from which paper is made
2
: fibrous material (as waste paper and boards) from which paper pulp may be made
| Stock http://www.printingforless.com/printingglossary.html#S The quality, thickness and finishes of the paper stock for your desired design project is a very important decision to make, because it effects your designs to a great extent. There are many types and styles of paper that are used for printing purposes such as various shades, textures, thicknesses, sizes and volumes. Today’s amazing printing technologies, whether offset or digital, have allowed for various types of paper that can be used to create different effects. Many paper suppliers or stockists will be more than happy to show you sample booklets of each category of paper they can provide. Different stocks produce different colours — for example, when colours are printed on un-coated, matte and coated stocks of paper, these produce variations of colors even if the same ink is being used. This happens because of the different absorbent properties of the stock. Fluorescent lights emit high levels of green and yellow. |
No comments:
Post a Comment